Building Desktop Apps with JavaScript and WebKitGTK
Published: 3/21/2026 | Author: DevScholar
Building Desktop Apps with JavaScript and WebKitGTK
WebKitGTK is the GTK port of the WebKit engine, which can be embedded into GTK applications to display web content. Unlike Electron, WebKitGTK uses the system-installed WebKit runtime, without needing to bundle a complete browser engine in the application installer, keeping the application size small. Through Node with GJS, we can create GTK windows and embed WebKitGTK controls in JavaScript, building interfaces with HTML, CSS, and JavaScript while retaining the ability to call native APIs.
WebKitGTK 6.0 corresponds to GTK4 and needs to be installed separately. Ubuntu/Debian users run apt install libwebkitgtk-6.0-0, Fedora users run dnf install webkitgtk6.0, Arch users run pacman -S webkitgtk-6.0. After installation, you can import the WebKit module in code.
Before creating a WebView control, you need to create a UserContentManager, which manages scripts and stylesheets injected into web pages, as well as handles messages sent from web pages. After registering a message handler through register_script_message_handler, the web page can send messages to the native side through window.webkit.messageHandlers.handlerName.postMessage.
import Gtk from 'gi://Gtk?version=4.0';
import WebKit from 'gi://WebKit?version=6.0';

const app = new Gtk.Application({ application_id: 'org.gtk.webkitcounter' });

app.connect('activate', () => {
    const window = new Gtk.ApplicationWindow({
        application: app,
        title: 'WebKit Counter App',
        default_width: 500,
        default_height: 400
    });

    const box = new Gtk.Box({
        orientation: Gtk.Orientation.VERTICAL,
        spacing: 0
    });

    const contentManager = new WebKit.UserContentManager();

    contentManager.connect('script-message-received', (manager, value) => {
        const message = value.to_string();
        if (message) console.log(`[WebView] ${message}`);
    });
    contentManager.register_script_message_handler('console', null);

    const webView = new WebKit.WebView({
        vexpand: true,
        hexpand: true,
        user_content_manager: contentManager
    });

    webView.load_uri('file:///path/to/index.html');

    webView.connect('load-changed', (webview, loadEvent) => {
        if (loadEvent === WebKit.LoadEvent.FINISHED) {
            console.log('Page Loaded Successfully');
        }
    });

    box.append(webView);

    window.set_child(box);
    window.present();
});

app.run([]);
WebView’s load_uri method loads the specified URL, which can be a local file path (file:// prefix) or a network address. The load-changed signal is triggered when the page loading state changes, LoadEvent.FINISHED indicates loading is complete. Setting vexpand and hexpand properties to true makes the WebView fill the available space.
The web page side needs some adaptation to communicate with the native side. WebKitGTK’s messaging mechanism is different from WebView2, the web page sends messages through window.webkit.messageHandlers.handlerName.postMessage, not window.chrome.webview.postMessage. You can inject a script when the page loads, redirecting console.log to message sending, so the native side can see the web page’s console output.
<!DOCTYPE html>
<html>
<head>
    <title>Counter</title>
    <script>
        (function() {
            const originalConsole = window.console;
            window.console = {
                log: function(...args) {
                    window.webkit.messageHandlers.console.postMessage(args.join(' '));
                },
                error: function(...args) {
                    window.webkit.messageHandlers.console.postMessage('[ERROR] ' + args.join(' '));
                }
            };
        })();
    </script>
</head>
<body>
    <h1>Counter App</h1>
    <p id="display">Clicks: 0</p>
    <button id="btn">Click to Add</button>

    <script>
        let clickCount = 0;
        const display = document.getElementById('display');
        const button = document.getElementById('btn');

        button.addEventListener('click', function() {
            clickCount++;
            const message = 'Button clicked ' + clickCount + ' times';
            display.textContent = message;
            console.log(message);
        });
    </script>
</body>
</html>
This script executes immediately when the page loads, replacing console.log with a call to window.webkit.messageHandlers.console.postMessage. This way all console.log calls in the web page are forwarded to the native side, making debugging easier.
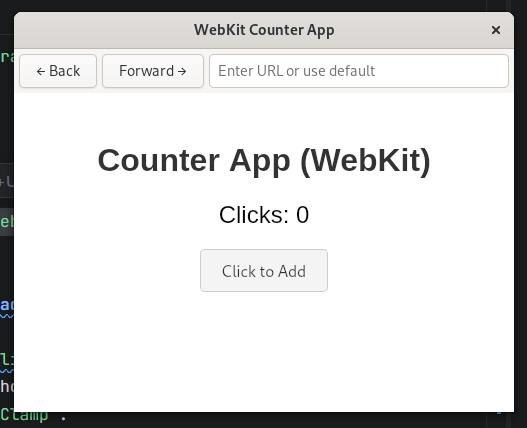
A complete browser example can also add a navigation toolbar with back, forward buttons, and an address bar. Back and forward are implemented through WebView’s can_go_back, go_back, can_go_forward, go_forward methods. The address bar is a Gtk.Entry control, the activate signal is triggered when the user presses Enter, reading the input URL and calling load_uri to load it.
const toolbar = new Gtk.Box({
    orientation: Gtk.Orientation.HORIZONTAL,
    spacing: 5
});

const backButton = new Gtk.Button({ label: '← Back' });
const forwardButton = new Gtk.Button({ label: 'Forward →' });
const urlEntry = new Gtk.Entry({
    placeholder_text: 'Enter URL',
    hexpand: true
});

backButton.connect('clicked', () => {
    if (webView.can_go_back()) webView.go_back();
});

forwardButton.connect('clicked', () => {
    if (webView.can_go_forward()) webView.go_forward();
});

urlEntry.connect('activate', () => {
    let uri = urlEntry.get_text();
    if (!uri.startsWith('http://') && !uri.startsWith('https://') && !uri.startsWith('file://')) {
        uri = 'https://' + uri;
    }
    webView.load_uri(uri);
});

toolbar.append(backButton);
toolbar.append(forwardButton);
toolbar.append(urlEntry);

box.append(toolbar);
The benefit of this architecture is that the interface layer is developed entirely with web technology, utilizing mature frontend frameworks, while the native layer provides system API access. Compared to Electron, the application installer size can be kept within a few MB because WebKit doesn’t need to be bundled. Compared to pure native development, interface development is more efficient.
Note the version compatibility of WebKitGTK. WebKitGTK 6.0 corresponds to GTK4, while the older WebKitGTK 2.0 corresponds to GTK3. The two have different APIs and cannot be mixed. Node with GJS currently only supports GTK4 and WebKitGTK 6.0. To run the example, execute node start.js your-file.ts, and the complete example can be found in the gtk-webkit directory of the node-with-gjs-examples repository.